GIF Animations are essentially the sequential display of a series of static GIF images. The GIF format allows for a single GIF file to contain multiple GIF images. In a GIF animation, these GIF images are referred to as frames. Basically, each frame of a GIF animation is created from and composed of a single static GIF image. These static GIF images are typically created with any number of computer graphic applications including photo editing applications such as Adobe Photoshop, vector applications (that export to GIF) such as CorelDRAW, or 3D applications such as Ray Dream Studio. In this tutorial, we will walk you through the basic process of creating, editing, and optimizing a GIF animation with GIF Movie Gear (GMG). The tutorial can be thought of as two separate lessons: Getting Started and Optimization Techniques:
Image files that are used in this tutorial can be found in this zip file.
Begin by opening up GMG and then select Insert
Frames from the File menu or click the toolbar button![]() .
Find the sample image files downloaded above.
There are be four files named alien1.gif, alien2.gif,
alien3.gif, and alien4.gif. These files were created with CorelDRAW and
Adobe Photoshop. Click on the alien1.gif file. Now, hold down on the shift key and
click on the alien4.gif file. All four GIF files should be selected as a result of
this operation. Hit OK to open the files in GMG (Figure 1).
.
Find the sample image files downloaded above.
There are be four files named alien1.gif, alien2.gif,
alien3.gif, and alien4.gif. These files were created with CorelDRAW and
Adobe Photoshop. Click on the alien1.gif file. Now, hold down on the shift key and
click on the alien4.gif file. All four GIF files should be selected as a result of
this operation. Hit OK to open the files in GMG (Figure 1).
You can also use the Open command to load animation frames. However, GMG will always
start a new animation when you use the Open command. If you already have frames loaded,
you can add more frames to the animation using the Insert Frames command, but if you use
the Open command, GMG will start a new animation (prompting you first to save any unsaved
changes to the previously opened animation).

Figure 1
While it may not be readily obvious, all of the frames of the animation have been opened in the correct order. The first frame of the animation should be the little spaceship/alien with no little yellow ring below it. In the second frame there should be a large yellow ring below the spaceship and in the last two frames the yellow ring gets smaller and further away from the spaceship.
These frames were imported in the correct order because they were saved in that order and because of how GMG imports GIF files according to how they are named. In other words, the GIF file that was intended to be the first frame was saved as alien1.gif, the GIF file that was intended to be the second frame was saved as alien2.gif, and so on. GMG orders multiple GIF files alpha/numerically. Since all of the GIF files have the same name except for the number at the end of the name, GMG used the numbers to determine their frame order. As a further example, if we had files named a.gif, b.gif, and c.gif, etc., GMG will place the a.gif file first and the c.gif file last.
GMG allows you
to see all of your frames at once. Click on the Zoom Out toolbar
button![]() if
you cannot see all the frames in your animations. Now Click and
hold down the mouse on the first frame of the animation and then
drag it to the right.
As you drag, notice the black I-beam line that shows up in between
the frames (within the gray borders that separate the frames).
This I-beam lines indicates where the frame will
be placed when you let up on the mouse. Drag the first frame all
the way to the right and let go of the mouse when the I-beam
line shows up on the gray border at the far right side
of the last frame. When you do this, the first frame will be repositioned
and it will now be the last frame.
if
you cannot see all the frames in your animations. Now Click and
hold down the mouse on the first frame of the animation and then
drag it to the right.
As you drag, notice the black I-beam line that shows up in between
the frames (within the gray borders that separate the frames).
This I-beam lines indicates where the frame will
be placed when you let up on the mouse. Drag the first frame all
the way to the right and let go of the mouse when the I-beam
line shows up on the gray border at the far right side
of the last frame. When you do this, the first frame will be repositioned
and it will now be the last frame.
If the last frame is not already selected, select it again. Now select Cut from the Edit menu or use the industry standard keyboard shortcut (Ctrl+X). Next, click on the first frame of the animation and then select Paste from the Edit menu or press Ctrl+V. Now the frame will be repositioned at the beginning of the animation. This demonstrates that GMG pastes frames in front of the selected frame. So, you can either reorder frames by dragging and dropping them into position or by cutting and pasting them. Incidentally, a paste goes to the end of the animation when no frames are selected and the File>Insert Frames command conforms to the same paste locations as the Paste command.
Before we move on, we have a few suggestions and notes that you should be aware. First, in this example, the files are numbered alien 1-4. If you have more than 9 frames in your animation, we suggest that you use double digit numbers. For example, frame 1 would be "frame01.gif", frame 5 would be "frame05.gif", frame 10 would be "frame10.gif", and so on. Doing this will ensure that animations with frames over 9 frames will be arranged in the proper order when you import multiple frames at once. Also note that names only matter when you are opening multiple frames at once. There is no automatic ordering when you import one frame at a time.
Now let's preview the animation. Click
on the Show Animation Preview toolbar button![]() or use the keyboard shortcut: Ctrl+P. When you
do this you will see the animation play in the Preview Animation dialog box exactly
as it would on a web page, including frame timing (which we'll cover in a second).
or use the keyboard shortcut: Ctrl+P. When you
do this you will see the animation play in the Preview Animation dialog box exactly
as it would on a web page, including frame timing (which we'll cover in a second).
There are several handy options in the Preview Animation dialog box that you should become familiar with. First notice that you can zoom in and out while you preview an animation. The preview dialog box is resizable, so you can zoom in on your animation and then scrutinize the smallest detail as the animation plays. Also notice the standard VCR-like controls/buttons for stopping, going to the first frame (rewinding), jumping to the last frame, and stepping back and forth through frames one at a time.
Notice that the background of the
preview dialog box defaults to a medium gray color. You can change this color. To do this,
click on the View Background As button (the small monitor icon![]() in the bottom center of
the dialog box). Doing this will open the standard Windows Color Picker dialog box.
Click on the little black rectangle in the bottom left corner of the "Basic
colors" section of the Colors dialog box and then hit OK.
in the bottom center of
the dialog box). Doing this will open the standard Windows Color Picker dialog box.
Click on the little black rectangle in the bottom left corner of the "Basic
colors" section of the Colors dialog box and then hit OK.
Now the animation is previewed over a black background. This features allows you to preview how an animation will look over a given color background which can be very handy if you use solid color web page backgrounds on your web site. For instance, if you look very closely you will notice that while the example animation's background appeared to be black, it is actually a very dark gray. Consequently, the animation's border stands out from the background. In other words, if this animation were placed on a Web page with a black background, it would not integrate with the background color seamlessly. Now we will look at how to fix this problem.
To close the Animation Preview window, click on the X in the upper right corner or hit the Esc button.
Editing Colors in an Animation
Click on the Edit Global Palette
button![]() on the toolbar
or select Edit Global Palette from the Animation menu. This brings up the palette editing
dialog. Place your mouse somewhere over the black background in the animation in the
preview window. The mouse cursor will change to an eye dropper cursor. A small pop up tag
will display the Red, Green, and Blue values under the bottom left tip of the eye dropper
cursor. Click when the pop up tag reads something like "R=18, G=20, B=21".
on the toolbar
or select Edit Global Palette from the Animation menu. This brings up the palette editing
dialog. Place your mouse somewhere over the black background in the animation in the
preview window. The mouse cursor will change to an eye dropper cursor. A small pop up tag
will display the Red, Green, and Blue values under the bottom left tip of the eye dropper
cursor. Click when the pop up tag reads something like "R=18, G=20, B=21".
This should select the first color square in the color table to the left of the preview window. The selected color swatch is indicated by a red outline around it. Now enter 0 for the Red (R), Green (G), and Blue (B) values (located below the color swatches). You have now changed the background color to pure black. If you look in the preview window you will see that you can no longer see the border between the background and the animation.
Now we will look at how to adjust timing
and looping of the animation in GMG. Click on the first frame. Now double-click in the
field next to the little clock icon![]() on the toolbar. Enter a value of 50. Frame delays in GIF animations are
measured in one-hundredths frame to display for half of a second. The default timing for
each frame is 10 which is 1/10th of a second. In other words, animations play
at a rate of 10 frame a second in GMG by default. (The default setting can be set in
the Edit>Properties dialog.)
on the toolbar. Enter a value of 50. Frame delays in GIF animations are
measured in one-hundredths frame to display for half of a second. The default timing for
each frame is 10 which is 1/10th of a second. In other words, animations play
at a rate of 10 frame a second in GMG by default. (The default setting can be set in
the Edit>Properties dialog.)
We have changed the frame delay for only the first frame. All three of the other frames are still set to 10 or 1/10th of a second. Click on the Preview button on the toolbar. Observe that now the animation pauses briefly on the first frame, plays the last three frames quickly, and then pauses on the first frame again. You can leave the preview window open while you make the following timing changes. GMG’s preview window will automatically reflect any timing changes you make in the preview dialog box.
You can also adjust individual frame
delays with the Frame Properties dialog box. Double-click on the third frame or
select the third frame and click on the Frame Properties button![]() on the toolbar or select
the third frame and select Properties from the Frame menu. Double-click on
the first field under the Animation section of the dialog box (the field that is
followed by the text that reads "1/100th seconds delay after frame"). Enter a
value of 200 and then hit OK. What does this do? Well, we have changed the value to
200/100ths of a second. This frame will now display for 2 seconds as you can see if you
watch the animation preview again.
on the toolbar or select
the third frame and select Properties from the Frame menu. Double-click on
the first field under the Animation section of the dialog box (the field that is
followed by the text that reads "1/100th seconds delay after frame"). Enter a
value of 200 and then hit OK. What does this do? Well, we have changed the value to
200/100ths of a second. This frame will now display for 2 seconds as you can see if you
watch the animation preview again.
This animation doesn’t look very good with frame 1 set to display for half a second and frame 3 set to play for two seconds. It looked much better when all the frames played at the same rate. Fortunately, GMG allows you to make global changes to an animation, including frame delay edits. To do this, select Global Properties from the Frame menu. Notice that the dialog looks almost exactly like the Frame Properties dialog; the difference is that any changes made the number 5 and hit OK. This will change all of the frame delays to 5/100ths of a second. Now look at the animation in the Preview Animation dialog box and watch that sucker go!
Now we will adjust the looping setting.
Close the Preview window. Double click in the field next to the looping arrow![]() on the toolbar. Enter a value of 5.
Click on the Preview button and you will see the animation play five times and then stops.
Like timing you can also set the looping.
on the toolbar. Enter a value of 5.
Click on the Preview button and you will see the animation play five times and then stops.
Like timing you can also set the looping.
As you can see, the looping setting determines how many times the animation replays. You can set an animation to play anywhere from only one time to continuous looping. A setting of "0" plays the animation continuously and any other number establishes the actual number of times the animation will loop. For instance, if you enter 10 for the loop setting, the animation will play 10 times and then stop. GMG allows you to adjust the looping settings either via the toolbar or the Animation Properties dialog box.
Now is a good time to save the animation using the File menu. Saving the animation essentially creates the animation. When you first create an animation, your only output options are Save As and Export As. Use Save As to create your animation. Thereafter you can use Save to save any edits to an animation and using Save As will save a unique version of the animation. Using Export As allows you to export an animation as an AVI file, a GIF Filmstrip, and/or an animated cursor.
Now the animation is ready to be added
to a Web page (such as this one). Select the HTML item from the File
menu. The "HTML Code" box at the bottom of the dialog contains the HTML code
that should be added to your Web page in order to place the animation there. Options are
provided for adding a label/hint, a link, and a border. For example, the finished animation
below was placed on this page with an HTML statement similar to the following:
<img src="alienani.gif" width=111 height=158 border=0
            alt="Alien Animation">
Optimization Techniques with GIF Movie Gear
Optimizing Animations
When we talk about "optimizing" an animation we are referring to reducing its file size. The smaller the file size of an animation, the faster it will download over the Internet. Usually the goal is to make an animation’s file size as small as possible while keeping the animation itself as presentable as possible. There are many different ways to optimize a GIF animation. Here are the possible ways to optimize a GIF animation:
- Reduce the number of colors used
- Use "Dirty Rectangle" Optimization
- Use transparency for Interframe Optimization
- Remove frames
- Crop the animation’s physical size
- Resize the animation to a smaller physical size
- Remove interlacing
GIF Movie Gear can perform all of these optimizations. Let’s look at each one. However, before we start let’s make a note of the animation’s file size before optimizations. GMG provides this information in the status bar at the bottom of its interface. At the far bottom left you will see the total number of frames in the animation along with which frame is currently selected. The next box to the right shows the dimensions of the animation followed by the total running time. Next to this you will see the current file size of the animation along with its estimated download time at a given Internet connection speed (you can change the Internet connection speed that GMG targets with the Download Time item located in the View menu). The last box shows the current zoom state.
This animation should be approximately 7,204 bytes which would take approximately 2 seconds to download over the Internet. Although two seconds isn’t a very long time, we can shave some bytes off of this animation so that it will download even faster.
NOTE: The effectiveness of the above optimization methods vary from animation to animation. All of the specifics discussed below include numbers that are specific to our sample animation. Results will vary depending on the animation being produced.
This particular animation has very few colors in it (take a look at the colors using Animation>Edit Global Palette), so it is already somewhat "optimized." This is because the colors in all of the files/frames amounted to only 35 colors when the frames were imported into GMG. In other words, the animation’s "global palette" (the palette used for all of the frames) contains only 35 colors. Animations that use a global palette can contain up to 256 colors. Typically, the more colors there are in an animation, the larger its file size. Due to how the GIF format compresses, this is not always true, but this generalization holds true for the majority of GIF animations.
You can reduce the number of colors in
the animation by either clicking on the Reduce Colors button ![]() on the toolbar or by
selecting the Reduce Colors option from the Animation menu. Figure 2 shows
the Reduce Colors dialog box which features two preview windows for the animation.
The window on the left shows the original animation and the window on the right shows the
animation after it has been color reduced. These side by side windows allow you to see the
animation before and after color reduction, which allows you to determine whether or not
the color reduction adversely affects the animation’s visual quality. GIF Movie Gear
even allows you to zoom in within the preview windows to scrutinize the differences more
closely.
on the toolbar or by
selecting the Reduce Colors option from the Animation menu. Figure 2 shows
the Reduce Colors dialog box which features two preview windows for the animation.
The window on the left shows the original animation and the window on the right shows the
animation after it has been color reduced. These side by side windows allow you to see the
animation before and after color reduction, which allows you to determine whether or not
the color reduction adversely affects the animation’s visual quality. GIF Movie Gear
even allows you to zoom in within the preview windows to scrutinize the differences more
closely.
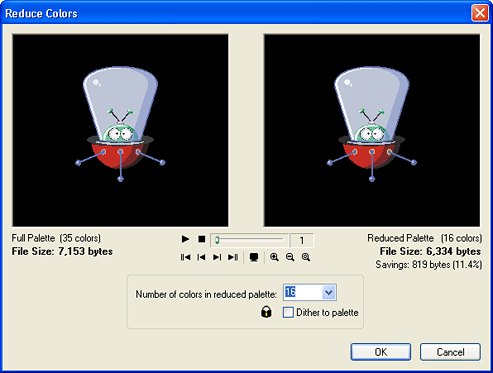 Figure 2
In our example, GMG automatically set the "Number of colors in reduced palette" drop down menu to a 32 color (5-bit) palette. Since this only removes 3 colors from the animation, go ahead and select 16 color (4-bit) from the "Number of colors in reduced palette" drop down menu. Now press play and compare the two variations. The preview on the left plays the original 35 color animation and the preview on the right plays the new 16 color version of the animation.
Notice that there is very little difference between the two versions of the animation. That’s the key. Also notice that the preview windows provides before-and-after file size information. In figure 2, the information below the right window indicates that going from a 35 color palette to 16 color palette will remove 812 bytes from the animation and that the 819 bytes saved amounts to a 11.3% file size savings. Reducing the animation to a 16 color palette reduced the overall animation down to 6,334 bytes. If you click OK, you will see that now our animation will only take 1.8 seconds to download over the Internet on a 28.8 modem connection.
If you look very carefully, you will notice that the yellow "propulsion rings" have become slightly orange-ish after the palette reduction. You can fine-tune single colors like this using the Edit Global Palette as discussed earlier.
"Dirty Rectangle" Optimization
Dirty Rectangle Optimization refers to a method of optimization that involves cropping frames in a GIF animation to their smallest needed rectangle. These frames are then played one atop the other using pixel coordinates for placement. The best way to understand this is to look at an example. Our little space alien example animation doesn’t benefit much from this type of optimization, so let’s look at a different example.
First let’s look at Figure 3 (Get the sample animation files here). As you can see, this animation is your basic bouncing ball animation. However, notice that the background (the yellow wall and the brown floor) have a noisy texture. Most importantly, notice that the background is identical in each frame: it is redundant information that is repeated over and over. This texture might make the animation a bit more interesting but it’s not so good for file size. Before optimization, this animation is 39.6Kb. This animation would take more than 12 seconds to download with a 28.8 modem. Fortunately we can do better than that.
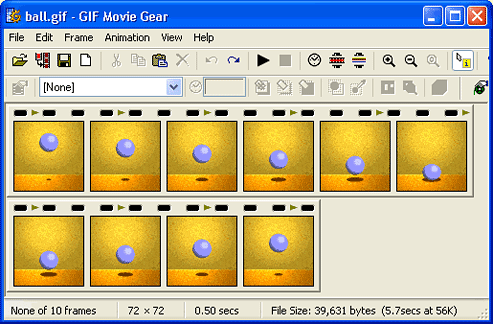
Figure 3
Open the file ball.gif (download samples).
Now click on the Optimize Animation button![]() or select Optimize from the Animation
menu. For now, make sure that the "Replace duplicate pixels with Transparency"
option in the Optimize Animation dialog box is not selected and then click
OK. The results of this operation is that all of the frames except for the first have been
reduced to smaller rectangular areas (as shown in Figure 4 where a few frames from the
animation are shown).
or select Optimize from the Animation
menu. For now, make sure that the "Replace duplicate pixels with Transparency"
option in the Optimize Animation dialog box is not selected and then click
OK. The results of this operation is that all of the frames except for the first have been
reduced to smaller rectangular areas (as shown in Figure 4 where a few frames from the
animation are shown).
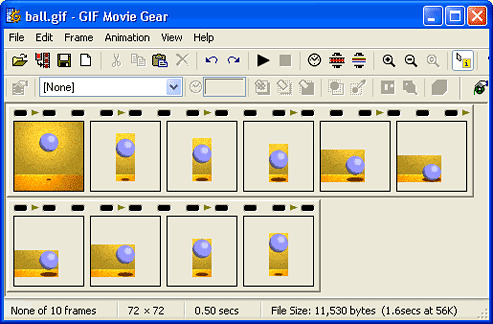
Figure 4
This operation has reduced the file size to only 11.5 Kb. That’s an over 30K file size savings. Now the animation takes just over 3 seconds to download. Much better.
It helps to know what’s happening with the "dirty rectangle" optimization option because of its impact on how you might design your animation frames, so let’s quickly cover how this form of optimization works. Basically each of the frames after frame 1 have been reduced to the smallest needed rectangle. The duplicated or redundant portions of the frames are cropped out. So, each frame after frame one is actually simply a smaller GIF file. The smaller GIF files are displayed over the first frame using pixels coordinates for their placement. Since the smaller GIF images only partially cover the first frame, you can still see parts of the original frame as the animation plays.
To verify this, double click on the second frame of the animation. This will open the Frame Properties dialog box. Notice that the Offset X and Offset Y options are (or should be) 26 and 12 respectively. These coordinates correspond to the top left corner of the image in the frame. Change these both to 1 and notice what happens. Now the contents of the second frame are positioned over the top left corner of the frame.
Unfortunately we can’t undo this operation, so close the animation without saving and reopen and re-optimize the animation as described above. Now notice that frame 5-8 actually haven’t been cropped to the smallest needed rectangle. All we need is the ball and the shadow, but areas to the left are still visible. This is because there are very slight changes in that region which GMG has detected. Fortunately we can easily fix this manually.
Click on frame 5 and select Move/Crop from the Frame menu. Notice that the GIF image for this frame is shown in the preview window with a bounding box around it. Click and drag the center square on the left side of the GIF image in the preview window. Drag to the left until the bounding box’s left edge is almost touching the blue ball. Let up on the mouse and click OK. If you repeat this operation for frames 6, 7, and 8 (see Figure 5) you should be able to lop off another 2.5K or so from the animation’s file size. The animation still plays exactly the same (no loss of data!), but the file size has dropped from 39.6Kb to 8.9Kb.
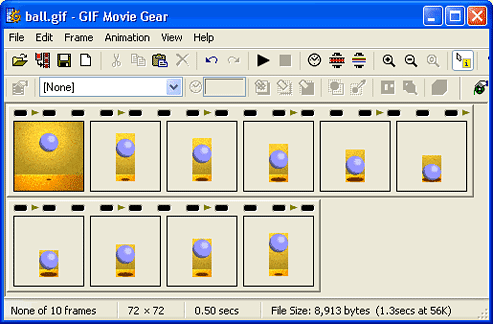
Figure 5
Interframe Transparency Optimization
An additional way to optimize an animation is to make the rest of the redundant portions of animation, those that are inside the "dirty rectangles," transparent. This often results in file size savings. You may already be familiar with the fact that GIF file can contain transparency information. In other words, some colors in a GIF file can be made transparent. When parts of a GIF file are transparent, they show through to any background imagery behind them.
For a static GIF image, this would mean that transparent portions of a GIF file would show through to the Web page’s background color or texture. You can take advantage of transparency within animations as well. Essentially, a GIF frame can contain transparent areas that show through to earlier frames. We refer to this as "Interframe Transparency."
All you need to do to optimize the
animation with interframe transparency is click on the Optimize Animation button![]() or select Optimize
from the Animation menu. The Frame Reduction section has three options:
"Shrink frames to smallest needed rectangle," "Replace duplicate pixels
with transparency," and "Remove unnecessary frame." We are only concerned
with the first two options for the purpose of interframe transparency optimization. The
"Shrink frames to smallest needed rectangle" option (which we just talked about
in the "Dirty Rectangle optimization" section) must be selected before you can
use the "Replace duplicate pixels with Transparency" option.
or select Optimize
from the Animation menu. The Frame Reduction section has three options:
"Shrink frames to smallest needed rectangle," "Replace duplicate pixels
with transparency," and "Remove unnecessary frame." We are only concerned
with the first two options for the purpose of interframe transparency optimization. The
"Shrink frames to smallest needed rectangle" option (which we just talked about
in the "Dirty Rectangle optimization" section) must be selected before you can
use the "Replace duplicate pixels with Transparency" option.
The "Replace duplicate pixels with transparency" option takes the idea of making portions of GIF animation frames transparent a little further than the "Dirty Rectangle" method. The idea is to remove all unnecessarily redundant pixels between frames. Sometimes this results in a significant file size savings, but not always. As with most optimizations, it depends on the animation itself.
For example, with the "Replace duplicate pixels with Transparency" on, the bouncing ball is reduced from 8.9Kb to 7.2Kb--a tidy little savings accomplished without any loss of data. On the other hand on the alien spaceship example the was no savings. In the alien spaceship animation there are a lot of black pixels around the little space ship that are redundant between frames 2, 3, and 4, but this doesn’t mean that making these areas transparent will decrease its file size--in fact it will likely increase the file size. Consequently, there is no difference in the optimization when you have the "Replace duplicate pixels with transparency" option on or off.
This apparent lack of transparency is because GMG is smart about how it applies transparency. When it determines that a transparency option will actually increase the file size, it avoids actually applying that option. So, for alien spaceship example animation, GMG doesn’t actually use inter-fame transparency even if you turn it on, because it would increase—not decrease—the animation’s file size.
In general, you can safely leave both of these options on and be confident that GMG will choose the best combination of interframe transparency optimization options that will result in the smallest file size or the large file size savings. They were discussed separately in this tutorial only for instructional reasons.
Incidentally, the "Remove unnecessary frame" option removes any duplicate frames in an animation. This feature is useful because some early GIF animation designers did not realize that each frame can have its own timing, so they used multiple copies of a given frame to build in pauses. For example, rather than timing a frame for a second, they would include 10 copies of the frame each timed at 10/100ths of a second. Those 9 extra frames added needlessly to the animation’s file size.
Finally notice that you can remove any interframe transparency and/or dirty rectangle cropping in any animation (including any animations you download from the Web) by selecting Unoptimize from the Animation menu. Below are the original and optimized versions of the bouncing ball animation:
 Original: 39,631bytes |
 Optimized: 7258 bytes |
Removing frames is simply a matter of selecting and deleting a frame. Of course, the fewer frames in an animation, the smaller the file size. In the spaceship animation, click on frame 4 and delete it. Notice that the resulting file size of the animation has been reduced to only 4,748 bytes a saving of almost 1,500 bytes. (You can restore the frame by using Undo, found in the Edit menu.) GMG also features an option called Reduce Count (in the Frame menu). This feature automates the removal of frames. For instance, if you have an animation with 20 frames, you can have GMG remove every other frame to bring the animation down to only 10 frames. This feature is particularly useful for animations created from digital video.
As a general rule, the dimensions of a GIF animation should be no larger than they absolutely have to be. For example, our example animation (the spaceship) is now overly large after we’ve deleted the last frame. No motion occurs over a significant portion of the bottom of the animation, so we can slice a bit off the animation’s file size by cropping out this portion on all of the frames.
To do this, select the frame that contains artwork that extends furthest to the bottom (which was frame 3). Now choose Crop from the Animation menu. To crop the animation, you simply drag the handles of the marquee in the preview window to the position you wish to crop to. To crop this animation, click on the bottom center handle and drag up until the Height is about 150 pixels. GIF Movie Gear also allows you crop numerically and you can preview the results before cropping. Click OK. Cropping the animation should reduce its file size to 4,733 bytes.
Reducing an animation’s dimensions is an obvious way to reduce the file size of an animation. GIF Movie Gear allows you to resize animation with the Resize option available in the Animation menu. You can resize animations according to numerical pixel dimensions or percentages. There is a "Maintain Aspect Ratio" option to keep the animation from becoming deformed. Resizing animations can adversely affect the palette and interframe transparency optimization so usually it is best to resize the animation before optimizing the palette or interframe transparency of the animation. Reducing the spaceship animation’s dimensions by 80% of its cropped size results in a file size of 3,551 bytes.
While interlacing can be somewhat helpful for static GIF images, it has no place in GIF animations because GIF animation frames typically display for a short period of time. Interlacing even slows down GIF animations and usually interlacing adds slightly to a GIF animation’s file size but not always. For instance, removing transparency from the cropped and resized version of the example animation actually adds five bytes the animation’s size. However, removing interlacing from the animation before resizing the animation reduces the file size of the animation by 10 bytes. In any case, it is almost always best to remove interlacing because at least the animation will no longer be needlessly slowed down during playback by interlacing. To quickly remove interlacing from all the frames at once, select the Global Properties feature from the Frame menu and uncheck the Interlace checkbox. Any changes made in this dialog will affect all the frames in the animation.